Mastering Displacement Maps in Adobe Photoshop
This comprehensive guide provides a step-by-step approach to applying displacement maps in Adobe Photoshop. Whether you’re looking to make your designs appear worn and distressed or seamlessly blend into a textured background, this tutorial covers everything from preparing the displacement map to fine-tuning the final effect.
ㅤ
Table of content
➊ What is a Displacement Map?
➋ Prepare the Base Texture Image
➌ Add the Text or Graphics
➍ Apply the Displacement Map
➎ Fine-Tune the Effect
➏ Save Your Work
ㅤ
➊ What is a Displacement Map?
A displacement map is a grayscale image that Photoshop uses to distort or displace pixels in another layer based on the brightness (or intensity) of the map. The displacement effect shifts pixels horizontally and vertically, creating the illusion that the applied layer conforms to the texture, contours, or surface of the underlying map.
In essence, it adds a sense of depth and realism by simulating how a surface would affect the appearance of overlaid text or graphics.
ㅤ

ㅤ
1. How It Works
A high-contrast grayscale image is ideal for displacement maps because it defines the intensity of the distortion.
- Light Areas: Pixels are displaced positively.
- Dark Areas: Pixels are displaced negatively.
ㅤ
2. Where Displacement Maps Are Useful?
- Achieve worn or distorted looks for text or images, often used in vintage or grunge designs.
- Apply logos or text to textured materials like fabric, wood, or concrete to make them appear embedded or printed on the surface.
- Add rippling effects to text or graphics placed over water or glass.
- Blend text or graphics with 3D-like surfaces to simulate natural curvature or depth.
- Create abstract or surreal distortions for artistic purposes, like twisting or bending text in unexpected ways.
- Integrate designs onto curved or textured surfaces for product prototypes, such as bottles, boxes, cans, or clothing.
ㅤ
3. Why Use Displacement Maps?
- They are a quick and effective way to add depth and realism to flat designs.
- Non-destructive and adjustable, especially when applied to Smart Objects.
- Extremely versatile, with applications ranging from branding mockups to experimental brutalist graphic design.
ㅤ
ㅤ
➋ Prepare the Base Texture Image
If you already have a pre-made pack of displacement textures, you can skip this step.
ㅤ
1. Open Adobe Photoshop and load the texture you want to use as the displacement map:
- This texture can be any surface that complements your design, such as grunge texture, wood grain, fabric, concrete, rippled water, wrinkled paper, brushed metal, or even abstract patterns.
- Choose a texture that adds the desired depth and realism to your final effect.
ㅤ
2. Convert this image to grayscale to create the displacement map:
- Go to Image > Adjustments > Desaturate.
- Adjust the contrast if needed to enhance details using Image > Adjustments > Levels or Curves.
ㅤ
3. Save this grayscale image as a separate file in PSD format:
- Go to File > Save As.
- Choose Photoshop (*.PSD) format and name the file (e.g., “DisplacementMap.psd”).
ㅤ

ㅤ
➌ Add the Text or Graphics
1. Open the document where you want to apply the displacement effect.
2. Add your text, logo or graphics:
- Use the Text Tool (T) to type text or import your graphics using File > Place Embedded.
- Ensure the text or graphic is on a separate layer.

3. Convert Text or Graphics to a Smart Object:
- Right-click on the text or graphic layer in the Layers panel.
- Select Convert to Smart Object. This step ensures the displacement effect is non-destructive and can be adjusted later.
ㅤ

ㅤ
ㅤ
➍ Apply the Displacement Map
1. Select the Smart Object layer in the Layers Panel.
2. Go to Filter > Distort > Displace.
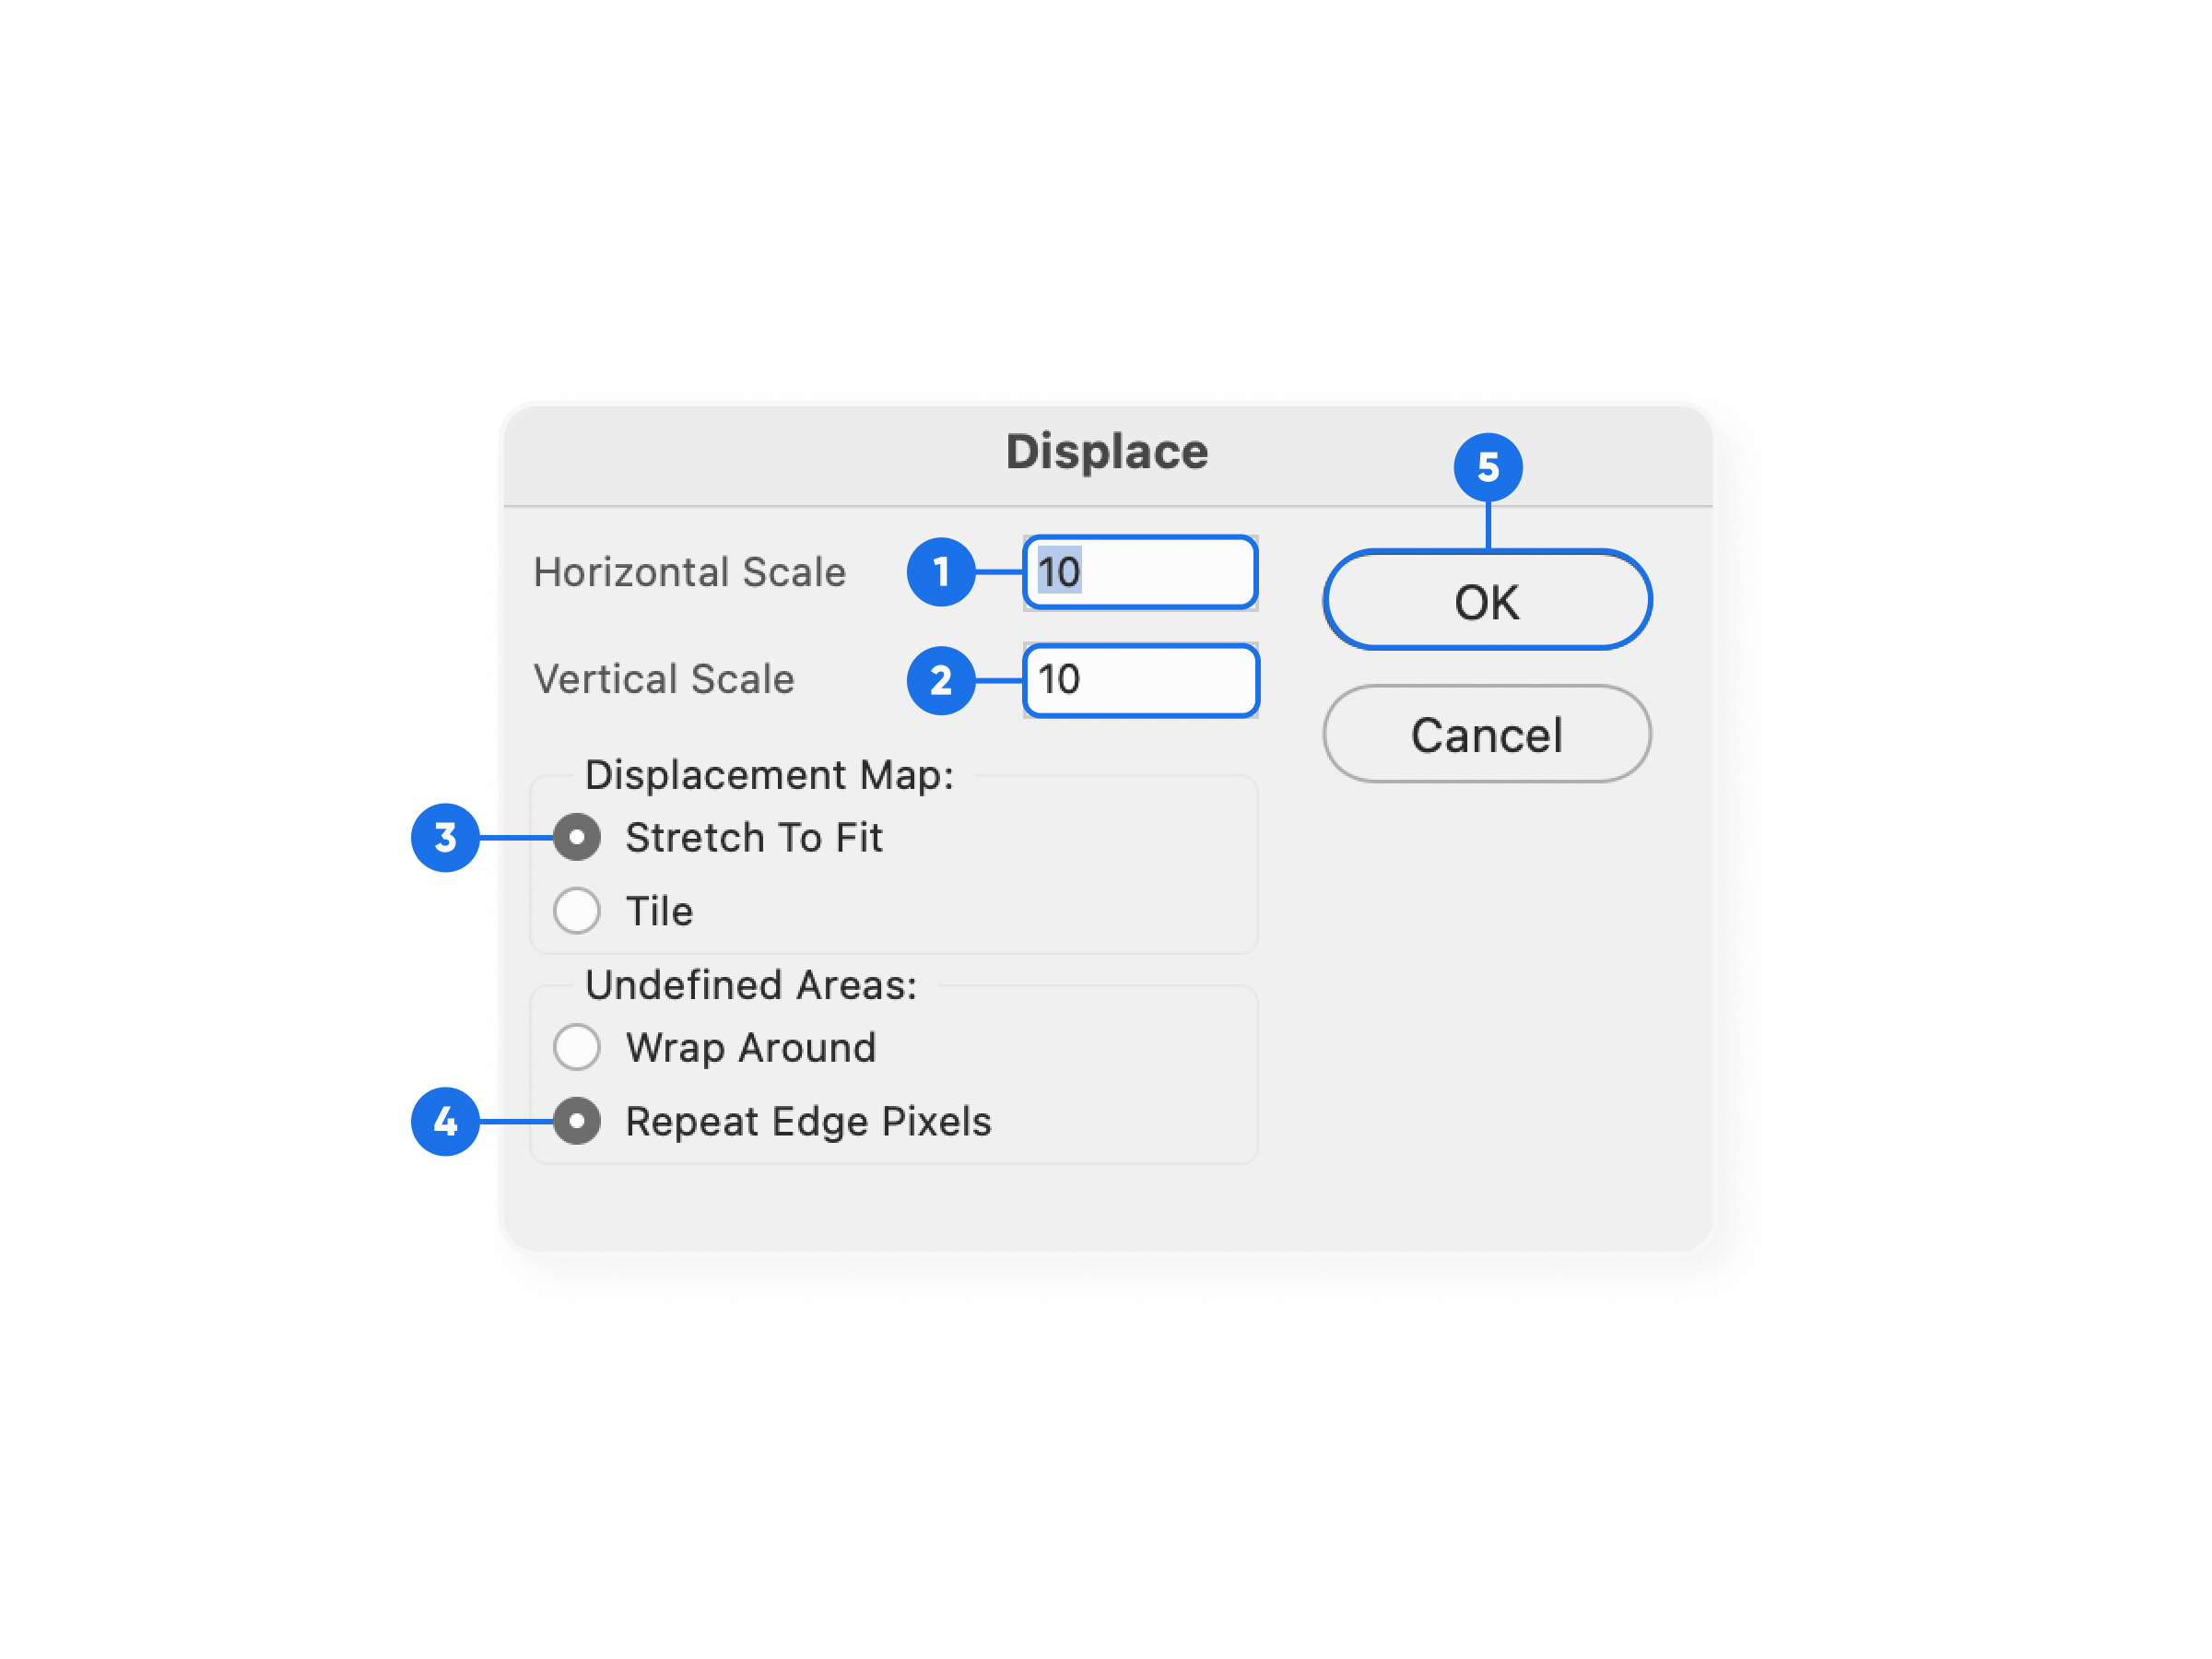
3. In the Displace dialog box:
- Set Horizontal Scale and Vertical Scale to control the intensity of the effect. Start with a value of 10–15 for subtle effects.
- Choose Stretch to Fit and Repeat Edge Pixels. Click OK.
4. When prompted, select the displacement map file you saved earlier (e.g., “DisplacementMap.psd”).
- Photoshop applies the texture from the displacement map to your text or graphics.
ㅤ


ㅤ
➎ Fine-Tune the Effect
1. To adjust the displacement intensity:
- Double-click the Displace filter under the Smart Filters in the Layers Panel.
- Modify the scale values or choose a different displacement map.
2. Adjust the blending mode and opacity of the text/graphics layer:
- In the Layers Panel, change the blending mode to Overlay, Soft Light, or another mode that integrates well with the base image.
- Lower the opacity if needed for a more realistic effect. Experiment with different blending modes and opacity settings to achieve the desired look.
3. You can also stack multiple displacement maps on top of each other to amplify the grunge effect, creating a layered, textured look with added depth and realism.
ㅤ
ㅤ

ㅤ
ㅤ
➏ Save Your Work
1. Save the file in Photoshop format (.PSD) to preserve layers and adjustments.
2. Export the final design for sharing or printing:
- Go to File > Export > Export As and choose the desired format (e.g., PNG, JPEG).
ㅤ
Now you can create stunning effects with displacement maps in Photoshop and elevate your designs to the next level!
Looking for more inspiration or resources? Browse our website to explore a wide range of premium texture packs and displacement maps tailored to suit all your creative needs. From grunge and paper textures to abstract and organic seamless patterns, we’ve got everything you need to make your designs truly stand out.
ㅤ
ㅤ